
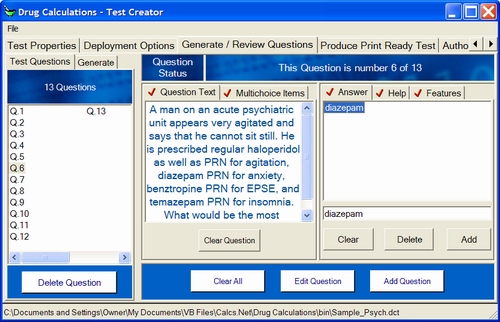
The test creator / editor is accessible from the main menu. The number of options at first glance appears somewhat bewildering but most options are already set by default. The various options are arranged in tab pages and hovering the cursor over most options will provide a brief description of the option.
Test Properties Tab:
Deployment Options Tab:
Generate Review Questions Tab:
The file needs to be saved in the application directory to enable the test to be displayed on the menu.
Provide a brief name for the test which will appear in the main menu and test results.
Provide a brief description of the test which will appear when the test is selected in the main menu.
If a valid URL or path to a file is provided, the How to... button will be displayed when the test is selected and the link opened when clicked.
Click the use system picture check box to browse and select a picture from the standard image collection that is shipped with the software. Otherwise browse for a picture of your own. Pictures should be no greater than 220x220 and may be of bmp, gif or jpeg format. Smaller pictures will be stretched to these dimensions. This picture will be displayed on the main menu when the test is selected. It will also be the default picture if no other pictures are provided in the test.
These are exactly the same options that users may select under general options. You must select the graphical features such as "prescription pad" if you plan to use it in your test, otherwise it won't be displayed, despite filling in the required fields latter.
Click this option to show the test on the main menu. Remember, however that the test needs to be saved in either the application directory or alternative search directory to be visible.
This prevents the test from being seen on the main menu. The only way to open it is by clicking on the file.
This will hide options whilst the test is being undertaken. To hide options on the main menu select this option under general options and save the selections.
This will password protect the test so that it can't be changed by users who don't know the password. Make sure that you write the password down as there is no way to retrieve it. Try opening the "Sample_Psych.dct" file. The password is "password" (which is case sensitive).
To enable the splash screen click on the Enable splash screen on test commencement check box. At any time click Preview to see how it will look on deployment.
Click the text areas of the splash screen (heading and instructions areas) to edit text
.![]()
Click on the tabs and options in the splash screen editor to change the various properties. Under picture Show Picture must be enabled to allow a picture to be shown on the screen. The link colour is the same as the button fore colour. See also: Other screen and dialogs.
Enable login for a stand alone login screen or incorporate it into the splash screen. N.B. If the splash screen is not enabled this option will do nothing. Click preview to see how it will look.
Select a field in the Login fields list box. Click delete to delete it. Type field names in the text box and click add to add them to the list of fields. There may be up to 3 fields.
Login Instructions
Type any additional instructions in the additional instructions / greetings text box. Fore colour, back colour, and font apply to the whole login screen and changes will be mirrored in the additional instructions text box.
There are two options:
Additionally, users may have a summary of results displayed.
Users may elect not to save results to a log file or select a file for the results from this test to be saved to. See also: Displaying Results.
 |
Editing Command Menu
|
||
|
|
Question Panel |
||
| The Question Preview and Editing Screens | |||
What ever is in the Question Preview and Editing Screens is affected by the three commands on the editing command menu.
This button will Add the content of the Question Preview and Editing Screens as a New Question. If the Test Questions Tab is open on the left you will see that a new question has been generated and selected. It's number will also be visible in the Question Status Bar.
If the button is enable the content of the Question Preview and Editing Screens will replace the question that is currently selected.
This clears the preview / editing screens. It does not delete a question in the test. Any changes that were made since the edit or add buttons were pressed will be lost.
Click on the tab name to view the contents
A list (in tree form) of the questions that Drug Calculations can generate is presented. Simply click on the question type (a brief description will appear below) and click the generate question button to create a question. The question will appear in the preview and editing screens replacing whatever content was there already.
This presents a list of all the questions in the test. Click on the list to select a question for addition or editing. The selected question may be deleted by clicking the delete button. The order of questions may be changed by clicking on an item and dragging it to another position.
When fields in this screen are completed or features selected a tick will appear on the associated tab.
The question panel consists of a text box for the basic question and a multi-choice tab for question items. Every test item must have at least have a basic question and one answer.
Enter multi-choice items (up to five) by entering text in the one line text box and clicking Add. To clear this box click Clear. This will add it to the list if there are less than five items in it. To select an item simply click it. You may then delete it or select it as an answer by clicking the Make this Item an Answer link.
There are no limits to the number of answers that can be created. Indeed, it is useful to consider a range of possibilities when the answer is to be given in text. For example, see the range of possibilities given for the 24 hour clock questions. All are correct but there are many ways to write the time. Pure numbers will be interpreted correctly e.g. 0.5 and .5 will be recognised as the same.
Type the answer in the one line text box and click the Add button to add it to the list of answers. Select an item by clicking on it.
Providing help or a solution is optional. This is the plain text screen that is shown in the test if the person selects Show Me.
This is not available for multichoice questions. Enter the information to be displayed on the prescription pad.
There are three options:
Click the use system picture check box to browse and select a picture from the standard image collection that is shipped with the software. Otherwise browse for a picture of your own. Pictures should be no greater than 220x220 and may be of bmp, gif or jpeg format. Smaller pictures will be stretched to these dimensions.

Once a test has been created 'print ready' versions can easily be created, edited and printed.
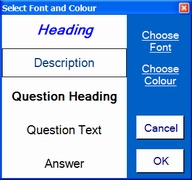 |
To print various elements click on the options. Clicking on the paint
brush icon will open a dialog to assist in picking fonts and choosing
colours for the test.
Select a question suffix and prefix for the numbered questions and click whether or not a new line is added after the question title. Select how multichoice items are to be numbered. |
Click the Produce Test button to append the text to the text box. The text can be edited, and manipulated much like a word processor. See: The text editing functions.
These details are shown in the Test Properties window which is available from the main menu.
When the window is closing the user will be asked whether or not to save the test. Tests can be opened by selecting open from the file menu.